一、源码安装munge
1、编译安装munge
(1)下载munge地址:https://github.com/dun/munge/releases
(2)解压编译安装:
| 1 2 3 4 5 6 7 8 | 创建/data目录 复制文件
进入源文件目录 cd /data/
|
2、创建用户并修改权限
| 1 2 3 4 5 6 7 8 9 |
|
3、配置文件及服务
(1)创建munge.key文件
执行以下命令完成以后,在/usr/local/munge/etc/munge/下面会生成munge.key,需修改munge.key的权限
| 1 2 |
|
![]()
【注意】:如果有多台服务器,需将服务端的munge.key发给客户端,客户端无需自己生成
(2)生成链接文件并启动服务
| 1 2 3 4 5 |
|
注:若是service服务
| 1 2 3 4 |
|
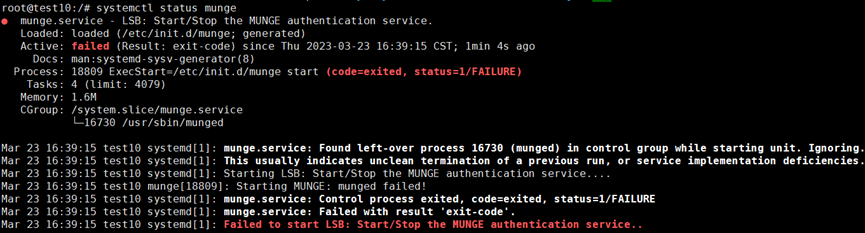
4、安装中会出现的问题
(1)configure报错
![]()
【解决方式】:apt -y install openssl-devel openssl
这里采用符合GPL许可的Open SSL加密库,如果是源码编译的此库环境,编译时需要通过--with-crypto-lib选择指定
或者源码安装openssl后--with-openssl-prefix=/usr/local/openssl
(2)文件权限和所有者有问题

/usr/local的文件权限和所有者有问题
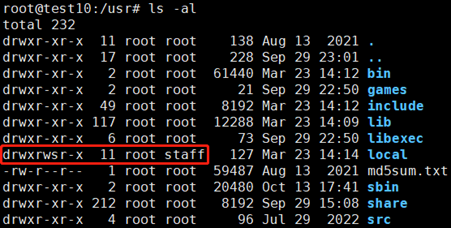
【解决方式】:修改/usr/local的文件权限和所有者
| 1 2 |
|
二、源码安装slurm
| 1 |
|
1、下载并安装
(1)下载地址:Download Slurm - SchedMD
| 1 2 3 |
|
(2)编译安装
| 1 2 3 4 5 6 |
|
查看vim config.log文件是否有错误
![]()

如果下面显示no,则需要重新./configure并指定,--with-mysql_config=/usr/bin

| 1 |
|
2、配置数据库
mysql -u root -p 登录到数据库进行下面操作
| 1 2 3 4 5 6 7 8 9 10 11 12 13 14 15 |
|
3、配置slurm文件及服务
(1)编辑配置文件(示例配置文件在源码包中的etc下)
| 1 2 3 4 5 6 |
|
【注意】:客户端只需要把服务端修改好的slurm.conf发过去即可,具体配置内容可在文末参考
(2)配置环境变量
| 1 2 3 |
|
(3)启动服务(服务启动文件在源码包中的etc下)
| 1 2 3 4 5 |
|
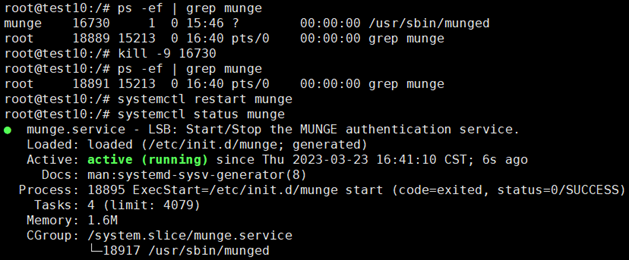
【注意】:客户端只需要slurmd
正常情况下显示绿色的active状态;如果失败,则用下面命令查看错误日志
| 1 |
|
启动后如果节点状态是down,可用下面命令启动节点:
| 1 |
|
4、slurm排错
重启slurmctld服务
| 1 2 3 4 |
|
(1)错误:mysql_real_connect failed: 2003 Can't connect to MySQL server on 'Intel:3306' (111)

数据库连接失败
查看3306端口是否开放远程连接

没有开放3306端口
修改vim /etc/my.cnf,添加port=3306,然后重启mysql;
(2)slurm_load_partitions: Zero Bytes were transmitted or received
客户端sinfo查看时出现x上面错误,一般是时间不一致,可用date查看时间日期。
解决:节点时间未同步,安装NTP后,启动ntpd服务即可。
三、openssl源码安装
1、下载安装openssl
(1)查看openssl版本
| 1 |
|

(2)下载相应版本openssl
下载地址:Old Releases | Library
| 1 2 3 4 |
|
2、测试验证
| 1 |
|
如果正确显示版本号,则安装成功。某些版本的操作系统会报下列错误
openssl: symbol lookup error: openssl: undefined symbol: EVP_mdc2, version OPENSSL_1_1_0

| 1 2 3 4 |
|
3、切换openssl版本
| 1 2 3 4 5 6 7 8 9 10 11 12 13 |
|
4、解决openssl报错
源码安装完OpenSSL后,打开一个新的窗口执行openssl version命令报错(一定要新开窗口执行openssl version)
(i)error while loading shared libraries: libssl.so.1.1: cannot open shared object file: No such file or directory
(ii)error while loading shared libraries: libcrypto.so.1.1: cannot open shared object file: No such file or directory

(1)方法一:
链接或拷贝/lib(lib64)和/usr/lib(lib64)和/usr/local/lib(lib64)存在的相应动态库
| 1 2 |
|
(2)方法二:
不指定安装目录,一般so会存放在/usr/local/lib这个目录底下,去这个目录底下找,果然发现自己所需要的.so文件

所以,在/etc/ld.so.conf中加入/usr/local/lib这一行,保存之后,再运行:/sbin/ldconfig -v更新一下配置即可。
| 1 2 |
|
其作用是将文件/etc/ld.so.conf列出的路径下的库文件缓存到/etc/ld.so.cache以供使用,因此当安装完一些库文件,或者修改/etc/ld.so.conf增加了库的新搜索路径,需要运行一下ldconfig,使所有的库文件都被缓存到文件/etc/ld.so.cache中,如果没做,可能会找不到刚安装的库。
四、连网yum安装munge
1、配置并安装munge
(1)添加munge用户
| 1 2 |
|
(2)安装munge
| 1 |
|
(3)执行以下命令,创建munge.key文件:
| 1 |
|
2、修改文件权限
执行完以后,在/etc/munge/下面会生成munge.key,需修改munge.key的权限以及所属用户,把所属用户改成munge(/etc和/usr应为root权限)
| 1 2 |
|
| 1 2 |
|
五、Slurm常用命令以及基本用法
1、查看可用资源sinfo
| idle | 节点空闲,可接受作业 |
| alloacted | 该节点已经分配作业且所有核心用满,在作业释放前不能再被分配作业 |
| mix | 使用部分核心,仍可以被分配作业 |
| drain | 对应节点已经下线 |
| drng | 节点已下线但仍有作业在运行 |
2、slurm提交作业命令
(1)交互式作业srun
srun命令属于交互式提交作业,有屏幕输出,但容易受网络波动影响,断网或关闭窗口会导致作业中断。
| 1 |
|

| 1 2 3 4 5 6 7 8 9 10 |
|
(2)批处理作业脚本sbatch
sbatch一般情况下与srun一起提交作业到后台运行,需要将srun写到脚本中,再用sbatch 提交脚本。这种方式不受本地网络波动影响,提交作业后可以关闭本地电脑。sbatch命令没有屏幕输出,默认输出日志为提交目录下的slurm-xxx.out文件,可以使用tail -f slurm-xxx.out实时查看日志,其中xxx为作业号。
<i、一个简单的Slurm脚本(job_run.sh)如下:
| 1 2 3 4 5 6 7 8 9 10 11 12 13 14 15 16 17 18 19 20 21 22 23 |
|
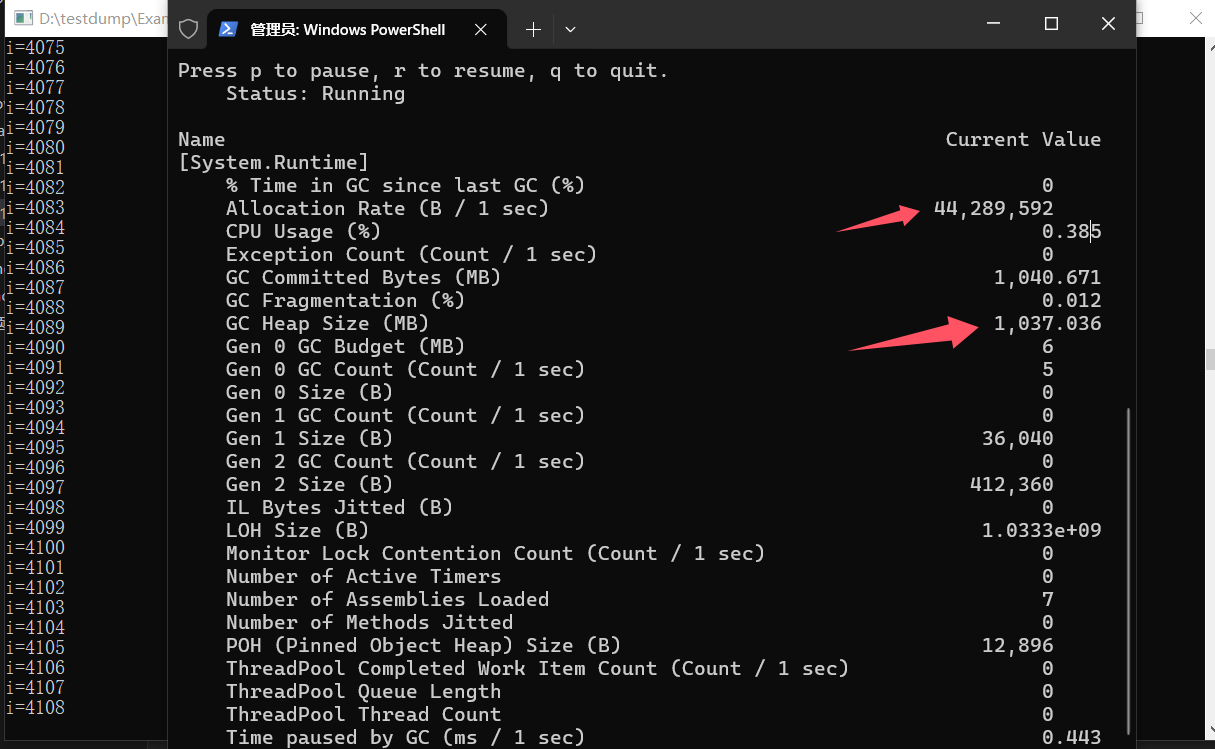
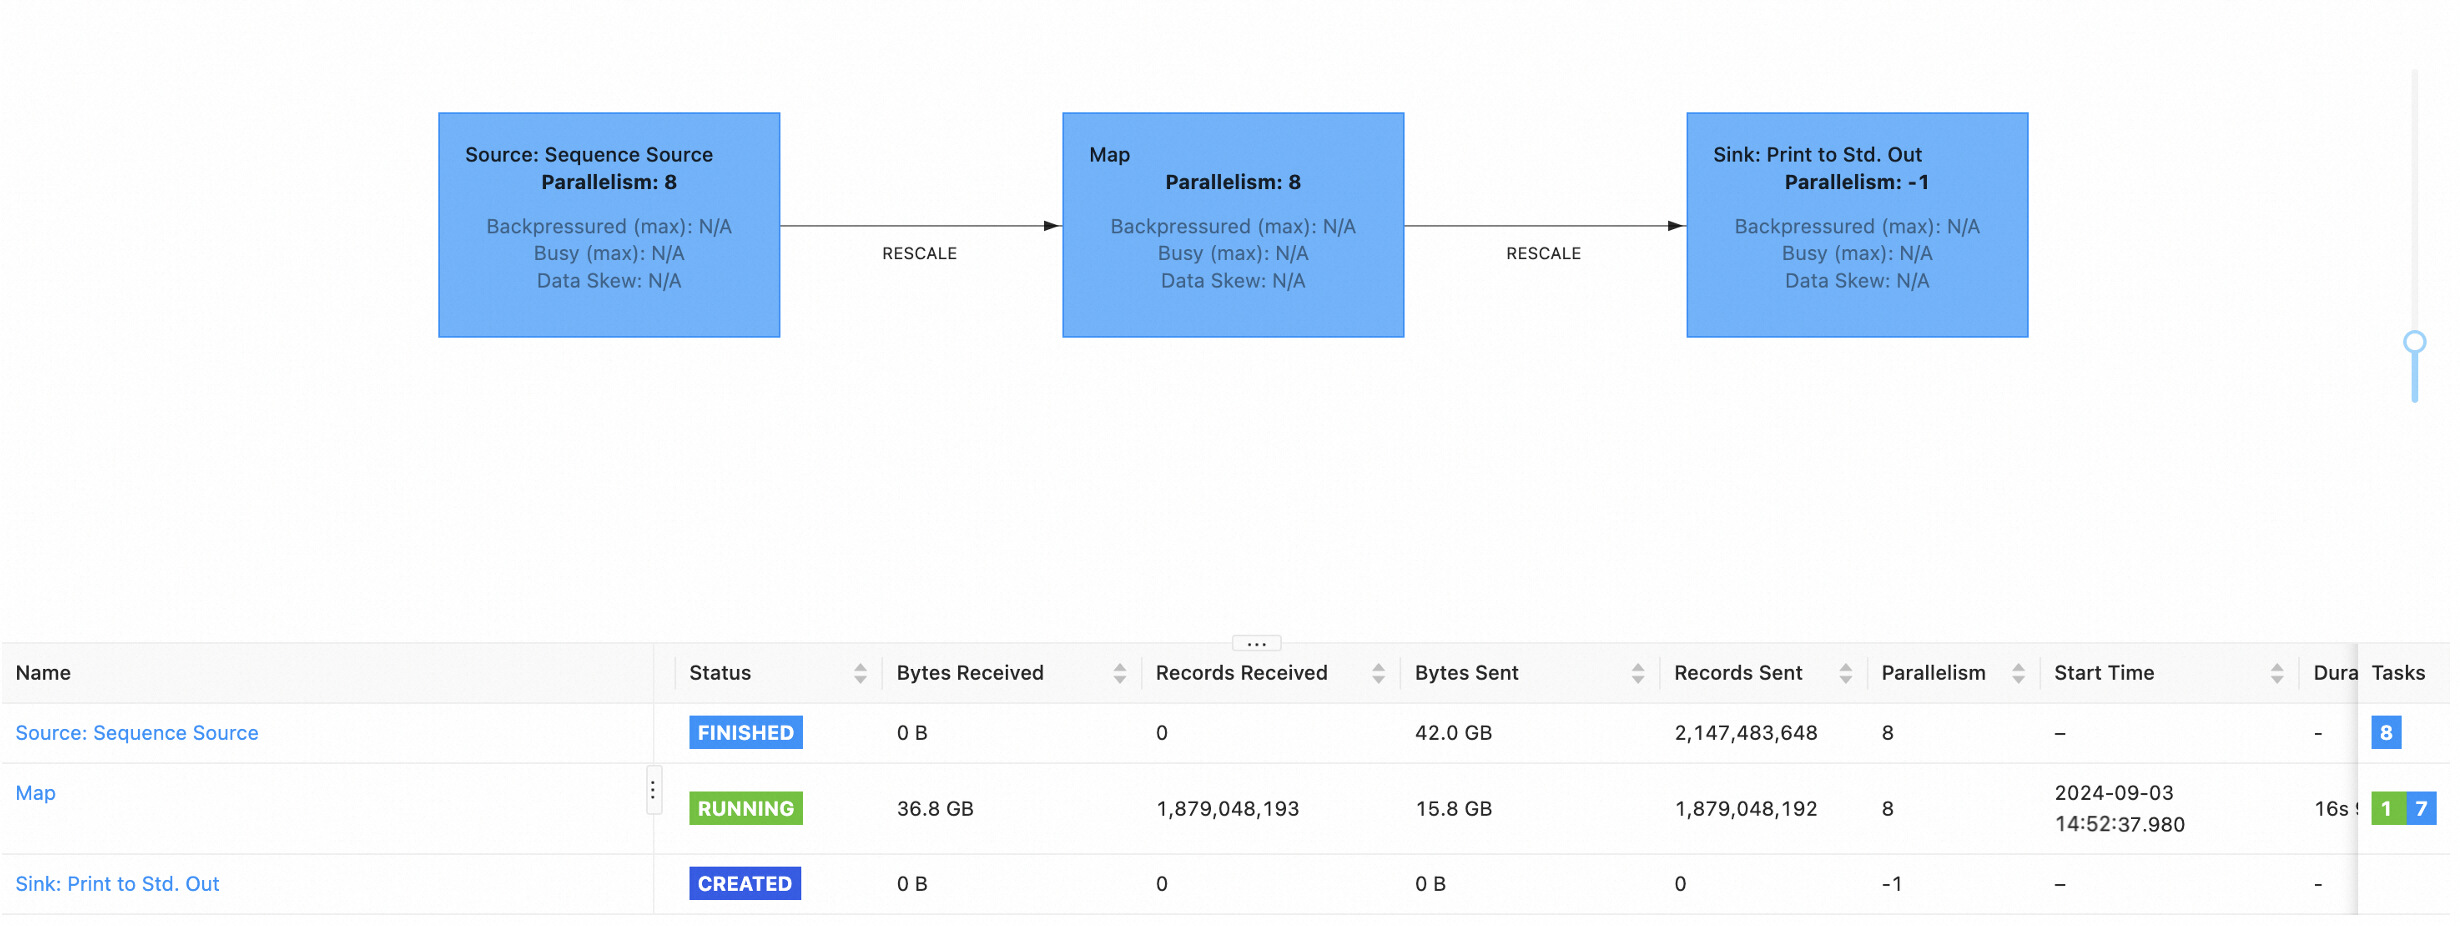
<ii、sbatch提交作业
| 1 |
|
![]()
3、查看作业状态squeue

| 1 2 3 4 5 6 7 |
|
4、删除作业scancel
| 1 |
|

| 1 2 3 4 5 |
|
5、查看任务信息scontrol
| 1 2 3 4 |
|
(1)scontrol对节点进行控制
scontrol命令可以管理Slurm集群中的节点,例如关机、重启和修改属性等操作。例如,要关闭节点x86b,可以使用以下命令:
| 1 |
|
(2)scontrol修改队列属性
scontrol命令可以管理Slurm队列,例如修改队列的最大CPU数、最大内存大小等属性。例如,要将q_x86队列最大CPU数更改为48,可以使用以下命令:
| 1 |
|
6、查询包括已完成作业信息sacct
输出内容会包括,作业号,作业名,分区,计费账户,申请的CPU数量,状态,结束代码
| 1 2 3 4 5 6 7 8 9 10 11 12 |
|
7、调度配置信息sacctmgr
主要负责管理账号,用户,集群分区等资源
| 1 2 3 4 5 6 7 8 9 10 11 12 13 14 15 16 17 18 |
|
六、slurm配置文件
(1)slurm.conf配置文件
| 1 2 3 4 5 6 7 8 9 10 11 12 13 14 15 16 17 18 19 20 21 22 23 24 25 26 27 28 29 30 31 32 33 34 35 36 37 38 39 40 41 42 43 44 45 46 47 48 49 50 51 52 53 54 55 56 57 58 59 60 61 62 63 64 65 66 67 68 69 70 71 72 73 74 75 76 77 78 79 80 81 82 83 84 85 86 87 88 89 90 91 92 93 94 95 96 97 98 99 100 101 102 103 104 105 106 107 108 109 110 111 112 113 114 115 116 117 118 119 120 121 122 123 124 125 126 127 128 129 130 131 132 133 134 135 136 137 138 139 140 141 142 143 144 145 146 147 148 149 150 151 152 153 154 155 156 157 158 159 160 161 162 163 164 165 166 167 168 169 170 171 172 173 174 175 176 177 178 179 180 181 182 183 184 185 186 187 188 189 190 191 192 193 194 195 196 197 198 199 200 201 202 203 204 205 206 207 208 209 210 211 212 213 214 215 216 217 218 219 220 221 222 223 224 225 226 227 228 229 230 231 232 233 234 235 236 237 238 239 240 241 242 243 244 245 246 247 248 249 250 251 252 253 254 255 256 257 258 259 260 261 |
|
(2)slurmdbd.conf配置文件
| 1 2 3 4 5 6 7 8 9 10 11 12 13 14 15 16 17 18 19 20 21 22 23 24 25 26 27 28 29 30 31 32 33 34 35 36 37 38 39 40 41 42 |
|
(2)
| 1 2 3 4 5 6 7 8 9 10 11 12 13 14 15 16 17 18 19 20 21 22 23 24 25 26 27 28 29 30 31 32 33 34 35 36 37 38 39 40 41 42 43 44 45 46 47 48 49 50 51 52 53 54 55 56 57 58 59 60 61 62 63 64 65 66 67 68 69 70 71 72 73 74 75 76 77 78 79 80 81 82 83 84 85 86 87 88 89 90 91 92 93 94 95 96 97 98 99 100 101 102 103 104 105 106 107 108 109 110 111 112 113 114 115 116 117 118 119 120 121 122 123 124 125 126 127 128 129 130 131 132 133 134 135 136 137 138 139 140 141 142 143 144 145 146 147 148 149 150 151 152 153 154 155 156 157 158 159 160 161 162 163 164 165 166 167 168 169 170 171 172 173 174 175 176 177 178 179 180 181 182 183 184 185 186 187 188 189 190 191 192 193 194 195 196 197 198 199 200 201 202 203 204 205 206 207 208 209 210 211 212 213 214 215 216 217 218 219 220 221 222 223 224 225 226 227 228 229 230 231 232 233 234 235 236 237 238 239 240 241 242 243 244 245 246 247 248 249 250 251 252 253 254 255 256 257 258 259 260 261 262 263 264 265 266 267 268 |
|
-